Behind the scenes of manufacturing
So we have detailed in our previous article, how was the « Design » part of our bags, and in particular the fact that our « creation process » is totally reversed to the one of a classic fashion brand.
Here are the steps that make up the manufacturing of your bag. We counted a total of no less than 40 steps from the moment the bag is thought up to the moment it is in your hands, could you imagine so many steps?
The technical sheet has been made, the prototype has been made by a modeler, and corrected if necessary by us. It is now time to move on to the production stage.
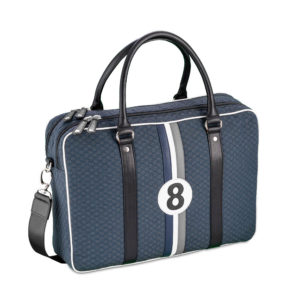
Let’s take the example of a computer bag like this one :
Step 1: Cutting
A bag is like a puzzle that you’re going to put together step by step.
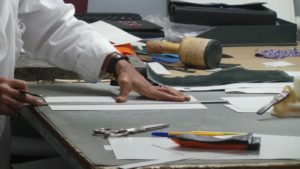
Cutting can be done in different ways: when you cut leather, you use punches that allow you to safely cut each piece to the same size. Furthermore, the punch allows you to stack several leather skins and cut them at the same time.
With our fabric it’s not so easy. It is often thick and does not allow the use of a punch. Also, you have to cut each piece manually, using a special cutter, around the pattern.
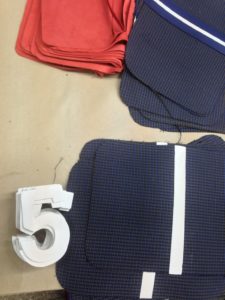
This bag contains 8 pieces of outer fabric. Also, you have to think that you have an inner lining with pockets, so about 8 to 10 pieces of lining.
Here we have detailed only the fabric.
You have to cut all the leather patterns, the handles, the shoulder straps, the zipper pulls, all the leather tabs, the shoulder strap, the inside and outside zippers…
See already the importance in terms of time of this step.
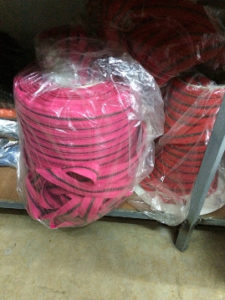
Step 2: Gather all the accessories
We do not detail the steps in order, as each workshop operates in its own way in terms of step scheduling. Nevertheless the objective is to show you the precision of the manufacturing, and all that you have to think about.
What are the accessories of this bag?
3 external zips, 1 internal zip, 2 D-shaped rings on the side, 2 carabiners (parts attached to the shoulder strap), 2 rings on the shoulder strap, rivets, bag feet, zip sliders and zipper pulls, 4 oval rings on the handles, piping.
But also the « upcycling fabric » label on the inside, the inner layer, the composition label, the outer label, the upcycling fabric pouch.
All these accessories have been carefully chosen at the time of creation, there can be as many different ones as there are models created, and purchases must be anticipated beforehand to ensure that you don’t miss anything.
Amazing, isn’t it? Joking aside, it’s so complex that we regularly run out of something at the time of manufacture, and that’s much less funny.
Step 3: The preparations
Before sewing or assembling the different parts, there are different kinds of preparation steps.
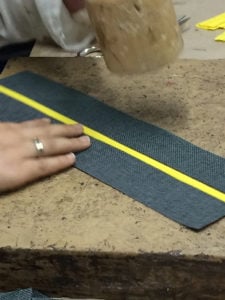
For example, the leather patterns on the bag are glued to the fabric, then hammered so that the glue holds well, they will then be sewn onto the bag.
One of the questions you often ask us: can I put the number I want on my bag? This is not possible, why?
The number is part of the pattern and the pieces that are sewn on the bag first, even before it is mounted. This is why we cannot change the number for you. For this, there is personalisation, which provides you with a solution! See our article on personalization.
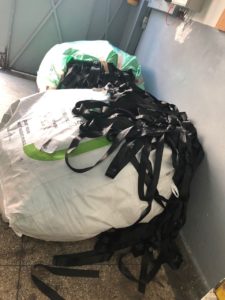
Seatbelts arrive loose in huge bags, so you have to sort each to find pieces of enough size for the handles and shoulder straps, and then iron them because they are crumpled.
On pieces of leather, a dye must be applied on the edge so that the leather is clean and smooth, this is called « edge dyeing », it takes a lot of time because it requires precision, and also a drying time.
Step 4 : Assembly
Once everything is prepared, it must be assembled. You’ve seen the number of pieces involved in making a bag, each one is sewn to the bag.
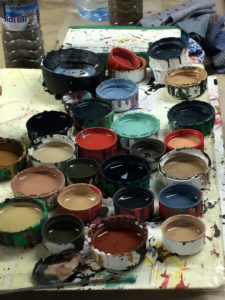
The colour of the thread must be chosen precisely, and this colour changes during assembly. Changing the thread is another step.
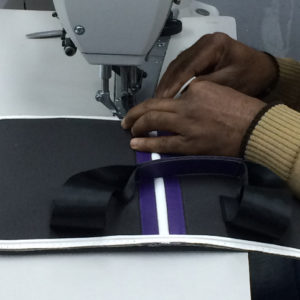
Stitching is a careful and time-consuming step.
Step 5: Quality and packaging
Once the bag is assembled, it goes to the quality stage. It is reviewed from all its seams in order to rule out any possible defects, cut the threads that protrude, check that the product is in conformity, then it is labelled and packed.

It remains to send it, to store it, … while waiting for you to order it.
This is a concise description of how your computer bag is made. We have simplified it because going into detail would be a little tedious, but you probably realize a little better all the parts necessary to manufacture your computer bag.
All of this has a cost, and you probably also understand the value of your bag. Everything is done to produce with the best quality and that your bag will be with you for as long as possible.
See you soon and don’t hesitate to share this article!